Nix development shell
The Nix development shell is a powerful tool to create dedicated and reproducible software environments, such as to describe the environment needed to build a program or a website on your computer.
The guides describes how to create a development shell using MyNixOS.
How to set up a development shell
Step 1 - Create your flake
Create a flake by signing in to MyNixOS, and then navigate to the create flake page.
On the flake create screen, enter an appropriate name, then click "create".
You should now see the name of your flake in the flake selector to the upper right on your screen.
A flake is a software configuration unit specific to the language Nix. Each flake has a set of inputs and outputs. Your development shell will describe an output in your flake. Note that your flake can have many outputs of different types at the same time. The inputs of your flake are locked to exact versions when you release your flake, which makes your configuration reproducible.
Step 2 - Create a development shell output
- Navigate to the flake outputs screen by clicking the flake selector to the top right of the screen, then select "Outputs" to the left on the flake screen.
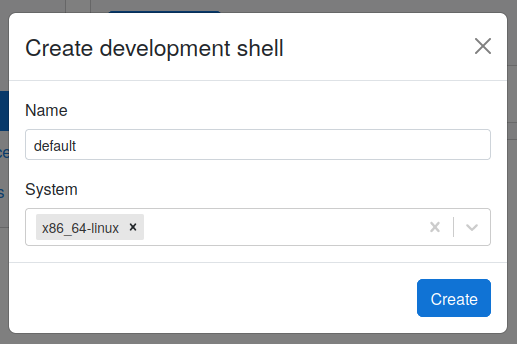
- From the flake outputs screen, select "Add output" → "Development shell".
- In the "development shell" dialog, select a name for the development shell or use the default, as well as the system. It is recommended to keep the default name if you are not using multiple development shell outputs. In this example, we select
defaultas the name andx86_64-linuxas the system.
Your development shell should now be shown in your flake as below.
Step 3 - Add packages to your development shell
Adding packages to your development shell will make them part of its environment.
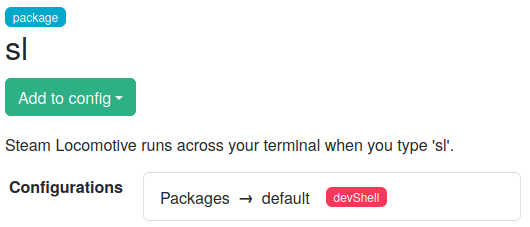
- Navigate to an essential package such as nyancat or sl.
- On the package screen, click "Add to config" and select your development shell output.
Step 4 - Test your development shell
Perform the following steps to use your Nix development shell using the flake loader:
- If you do not have Nix installed on your system, follow "Install Nix with existing system" and "Install direnv + nix-direnv" in Install.
- Navigate to the flake versions screen (Click the flake selector, then select "Versions").
- Click "Release" to create a version of your flake (Learn about releases)
When the release is ready, a new version entry appears in the listing on the flake versions page. - In your terminal, navigate to your project directory and install the flake loader:
sh <(curl -L https://mynixos.com/install-loader) <username>/<flake>
Congratulations! If you have direnv and nix-direnv installed on your system, your Nix development shell should now be loaded, and you have a reproducible environment.
To celebrate, run the sl command.
NB: When you create new releases of your flake in MyNixOS, remember to run nix flake update in your project folder to update the flake reference.